Image © Mimio
Educators know that interactive whiteboards (IWBs) are costly, a tripping hazard if on wheels or and unmovable once fixed to a classroom/library wall. For some small schools, it is a reality that IWBs may simply be too expensive to implement school-wide. But there are alternatives. Other schools may prefer the functionality of IWBs but not the board itself. There are solutions to suit this preference too.
Whatever your situation or preferred classroom layout, there are various alternatives to purchasing IWB's, including:
Whatever your situation or preferred classroom layout, there are various alternatives to purchasing IWB's, including:
- Projector Solutions: Interactive vs Standard Projectors
- One-To-One iPad Solutions
- One-To-One Smartphone Solutions
Interactive Projectors
Interactive projectors eliminate the need for an affixed interactive whiteboard. However, users can only interact using a specifically designed pen. Watch the video below to see an example.
Watch the Epson Australia video here (Flash based).
There are three types of interactive projectors:
Interactive projectors come packaged with software tools to allow users to draw, annotate and capture images (e.g. Click here to download Epson's Easy Interactive Tools).
The market leader in interactive projectors is Epson. Click here to see their current product range. For cheaper alternatives check out HiVista's product range.
There are three types of interactive projectors:
- Interactive ultra short throw: The projector is affixed directly on the wall above the desired surface and users interact with a specially designed pen ($AU2600+)
- Interactive short throw: The projector is affixed to the wall approximately 0.5-1 meter above the desired surface and users interact with a specially designed pen (most of these models have now been replaced with interactive ultra short throw projectors)
- Interactive Mid range: The projector is placed on a table 2-3 meters from the desired surface ($US1300+)
Interactive projectors come packaged with software tools to allow users to draw, annotate and capture images (e.g. Click here to download Epson's Easy Interactive Tools).
The market leader in interactive projectors is Epson. Click here to see their current product range. For cheaper alternatives check out HiVista's product range.
Standard Projectors
A cost-effective standard projector can be readily purchased (if the school does not already own one) and connected to a PC or laptop. There are a wide variety of projector types:
Whilst teachers and students can always interact with the projected image by using the laptop/PC connected to the projector, there are a number of easy solutions that allow teacher and students to interact with the projected image/laptop from any location within and outside of the classroom, including:
- Ultra short throw: $1500+ (Affixed directly on the wall above the desired surface)
- Short throw: $650+ (Affixed approx 1 meter to the roof above the desired surface)
- Mid Range: $60+ on ebay (Placed at least 2 meters from the desired surface affixed to the roof or placed on a table)
Whilst teachers and students can always interact with the projected image by using the laptop/PC connected to the projector, there are a number of easy solutions that allow teacher and students to interact with the projected image/laptop from any location within and outside of the classroom, including:
- MimioTeach Interactive System: $800 (A portable magnetic bar that detect movements of a specifically designed pen)
- Motion Sensing Solutions: $0-$149 (Uses Microsoft/X-Box Kinect or similar system)
- Portable Infrared USB & Pen Solutions: $20-$250 (also includes Wiimote solution)
- Projector with Secondary Device: Nominal price (e.g phone/tablet)
- Interactive Drawing/Desktop Capture Tools: Free
MimioTeach Interactive System

MimioTeach is a highly portable and cost effective interactive system. It consists of a magnetic bar that sense the movements of an interactive pen. The MimioStudio software contains screen and pen movement capture like that of any ordinary interactive whiteboard. Watch the video below for more details.
Check out your nearest MimioTeach reseller here.
Check out your nearest MimioTeach reseller here.
Motion Sensing Solutions
An alternative to interactive projectors is to use a standard projector with a motion sensor such as a Microsoft Kinect or a Leap Motion.
Solution 1: Leap Motion
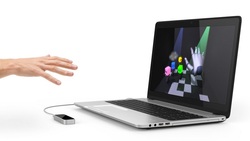
Leap Motion is a tiny USB device (for only $US99) that tracks hand and finger gestures (point, wave reach and grab) that allows users to control a computer. Leap Motion can even be used in combination with virtual reality headsets!
Check out this page to learn more!
Check out this page to learn more!
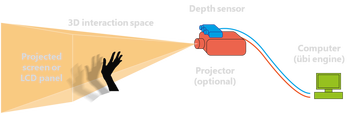
An emerging technology, motion sensors such as Microsoft's Kinect or any OpenNI Compatible 3D Sensor are making touchless gesture interactions possible when combined with a software solution! Read more below to find the solution that best suits your needs and budget.
Hardware
Kinect For Windows & X-Box
Kinect (Microsoft's motion sensing unit) when combined with a software solution (requires Windows 7 or 8), allows users to interact and control a Windows/Mac PC without a tablet, mouse or IWB, as users instead control a PC using gestures and voice commands!

Kinect For Windows Kinect For X-Box One (Bundled) Kinect For X-Box 360 Kinect Diagram
All versions of Microsoft's Kinect sensor are able to be used.
- Kinect For Windows retails for $AU270 for individuals with Academic Licensing prices available
- Kinect for X-Box 360 can be purchased for $AU149 brand new or second hand (e.g. ebay) for much cheaper
- Kinect For X-Box One (updated and more powerful) comes bundled with an X-Box One and normally retails for for $599.
OpenNI 3D Sensors
An alternative to Microsoft's Kinect, OpenNI 3D Sensors are based on the OpenNI open source platform. Open NI 3D sensors include:
- Asus Xtion Pro / Xtion Pro Live (Purchase links)
- PrimeSense Carbine (no longer in production).
Software
Use the links below to navigate to the solution that best suits your needs:
Ubi Interactive
Ubi provide a variety of paid software touch solutions (from 1 touch point to 20) designed for use with a Microsoft Kinect (for X-Box or Windows). Watch the videos below and be amazed!
Ubi Interactive also comes with an optional pen to make writing, annotating and other content creation activities much more precise, ergonomic and responsive.
Prices range from $US149 to $US1499. No free download is available to the public but they are accepting requests on a case by case basis to receive a demo via this link. Discounts are available for volume and academic purchases.
Prices range from $US149 to $US1499. No free download is available to the public but they are accepting requests on a case by case basis to receive a demo via this link. Discounts are available for volume and academic purchases.
Hardware:
- Kinect for Windows Sensor
- Projector
- Computer with Windows 8 (4GB RAM, Dual-core 2.66-GHz)
Touchless Touch
Touchless Touch turns any surface into a multi-touch screen, supporting 128 touch-points. Works with both Kinect and OpenNI sensors.
A free unlimited trial version is available but it can only be used for personal use and comes with a Touchless Touch logo watermark on the display. The paid versions costs $US60.
A free unlimited trial version is available but it can only be used for personal use and comes with a Touchless Touch logo watermark on the display. The paid versions costs $US60.
Hardware:
Download and install in this order:
- (i) Connect a project to a laptop/PC and turn on the projector OR (ii) Connect a laptop/PC to an interactive whiteboard and turn both on.
- Mount the Kinect sensor(s) flat against the touch surface in one of the corners, pointing diagonally across to the opposite corner, at least 60cm away from the touch area
- Connect the Kinect via USB to the laptop/PC
- Follow the calibration instructions from here.
Download and install in this order:
- If using Kinect For Windows: Touchless Touch Software + Manual
- If using Kinect for X-Box: Kinect for Windows SDK, Touchless Touch Software + Manual
ViiHaptic
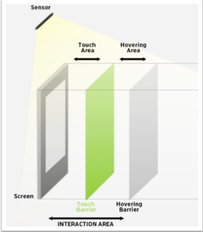
ViiHaptic when combined with a sensor such as a Microsoft Kinect amazingly turns any display or surface of any size into a multi-point touch screen!
ViiHaptic can also use the depth sensors contained within a Kinect to determine the difference between a touch and a hover (near touch), allowing users to potentially not just touch but also "handle" contents at a distance (pictured left).
Watch the video below to see ViiHaptic in action:
ViiHaptic can also use the depth sensors contained within a Kinect to determine the difference between a touch and a hover (near touch), allowing users to potentially not just touch but also "handle" contents at a distance (pictured left).
Watch the video below to see ViiHaptic in action:
Installation Instructions:
- Download ViiHaptic (15 day free trial) or buy it from here.
- If you are attempting to install ViiHaptic on a Windows 8 or 8.1 PC, you must enable notification for driver signature verification by following the steps from here: Windows 8 / Windows 8.1.
- Run the installation file.
- OpenNI 1.5.4.0 will install.
- PrimeSense 5.1.2.1 will install and you should be prompted with the following warning:
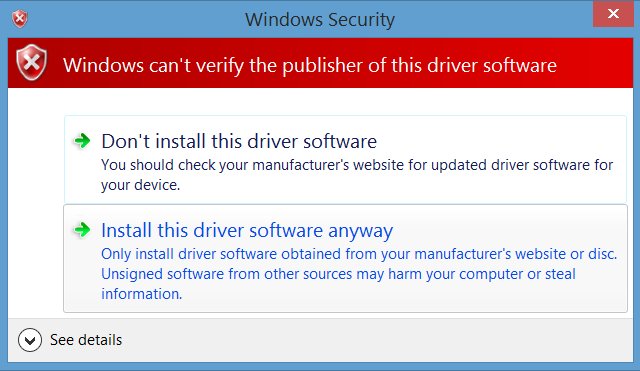
Click on 'Install this driver software anyway. Note: If the above warning message does not appear then you must enable notification for driver signature verification by following the steps from here: Windows 8 / Windows 8.1.
6. PrimeSense Kinect Mod will install.
7. Restart the PC.
8. Connect the Kinect via the PC's USB port.
9. Place the Kinect as depicted in the image and discussed in the dot points below:
6. PrimeSense Kinect Mod will install.
7. Restart the PC.
8. Connect the Kinect via the PC's USB port.
9. Place the Kinect as depicted in the image and discussed in the dot points below:

Image © Covii
- The Kinect sensor should be placed more or less perpendicular to the screen or surface one wants to turn interactive
- The distance between the Kinect sensor and the surface should be sufficient so that the sensor can “see” all the area you want to interact with, and that depends on the sensor (and lenses) used
- The Kinect sensor should be place at a distance greater than 500mm because this is the smaller distance one can obtain a depth image.
- The horizontal field-of-view for this type of sensor is bigger than 45 degrees, which means that you can fit in the image an object slightly bigger than the distance you are from it (e.g. If you have a screen that is 800mm wide and want to interact with all of the screen’s area, you can place the sensor at a distance of 800mm).
11. Configure the Kinect and ViiHaptic following Section 5 of the ViiHaptic documentation.
Winect
Winect is a free program that allows users to control Windows using hand gestures.
Hardware:
Software
Download and install in this order:
- Connect a laptop/PC to a projector
- Turn on the projector
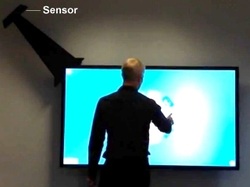
- Place the Kinect sensor on the ledge of the classroom whiteboard/wall where the projector is projecting onto
- Connect the Kinect via USB to the projector
Software
Download and install in this order:
- Uninstall any Microsoft Kinect drivers
- Uninstall any OpenNI, NITE, Prime Sense and Prime Sense Kinect Mod programs and drivers
- Restart the computer
- If you are using Windows 8 or 8.1, you must enable notification for driver signature verification by following the steps from here: Windows 8 / Windows 8.1
- Install Microsoft .Net 3.5 Client Profile
- Install OpenNI 1.5.x.x (Development Version)
- Sensor Kinect Driver: Step 1: Download Sensor Kinect Driver. Step 2: Then open the unzipped folder and navigate to Bin folder (avin2-SensorKinect-2d13967\Bin). Step 3: Run the msi windows file according to 32-bit or 64-bit PC select the windows installer package i.e., SensorKinect-Win-OpenSource32-5.0.3.4 for 32-bit PC or SensorKinect-Win-OpenSource64-5.0.3.4 for 64-bit PC.)
- Install OpenNI Nite (Development Version)
- Restart computer
- Install Winect Software
- Now Plug in the Kinect external power supply and connect to the computer USB port. The new hardware should then be detected and drivers installed. If successful these will show up in Device Manager as items Kinect Audio, Kinect Camera and Kinect Motor under Prime Sense (In order to check whether the driver is successfully connected to your PC navigate to Device Manager (Control Panel--Printers and Other Hardware--System--Hardware--Device Manager or go to My Computer--Right Click--Properties--Hardware--Device Manager).
Portable Infrared USB & Pen
A portable IR/Pen/USB solution is now available for $150-$250. See the videos below and use the following links to access resellers and competing brands (Amazon, Ebay).
Click here to learn about another portable IR/Pen solution (discussed below) using Nintendo Wiimotes.
Wiimote Solutions
Ever since Johnny Lee built the first program designed to use Nintendo Wii Remotes (Wiimotes) as an extremely cheap alternative to interactive whiteboards the mind has boggled (watch his video below and visit the WiimoteProject for more information).
All you need is:
All you need is:
- A PC with a bluetooth adaptor (most laptops have built-in bluetooth chipsets or buy a USB bluetooth adapter for $2 on ebay and download your PC/laptop's bluetooth stack).
- An infrared pen
- 1 or 2 Wii Remote or Wiimote Plus
- A projector and a flat surface.
However, the Wiimote technology flawed, very touchy and is not suitable for those who are not extremely patient or a very technically adept.
There are some very handy programs for those who would like to explore the Wiimote solution further, including:
There are some very handy programs for those who would like to explore the Wiimote solution further, including:
- Wiimote Whiteboard: Smoothboard Air with Duo - Features
- WiiMote Mouse - Requires USB/Wireless IR Sensor Bar - Allows you to point your wiimote at the board (instead of using mouse movements) and click using A or B button (instead of a mouse button)
Projector with Secondary Device
Parallels Access
Price: Free (14 day trial) then $59.99 per year
Description: A simply brilliant app that allows iPad users to remotely connect to Windows/Mac and interact with it like it was actually an iPad! It combines the best of both Windows/Mac and iPad! Watch the video below! Simply follow these three easy steps:
1. Create an account
2. Download the server on Windows/Mac (the link does not work in Chrome for some reason)
3. Install the iPad app
Wireless Remote Mouse
Price: Free (upgradable to Pro for $5.49)
Description: An app for iPhone and iPad designed by Benzel, for interacting with a Windows or Mac that are connected to the same wireless network. Features trackpad, keyboard, customised buttons for internet browsers and the Microsoft Office suite (e.g. PowerPoint). Wireless Remote Mouse server must be installed on the Windows/Mac which can then be remotely controlled via the Mouse app installed on the iPad or iPhone.
Screenshot 1 | Screenshot 2 | Video

Unified Remote
Price: Free
Description: Use an Android device to control a Windows PC that is connected to the same wireless network. Contains a number of customised interactions for various programs (e.g. Windows Media Player). The PC must have Unified Remote Server installed. Screenshot 1 | Screenshot 2 | Video
Price: Free
Description: Use an Android device to control a Windows PC that is connected to the same wireless network. Contains a number of customised interactions for various programs (e.g. Windows Media Player). The PC must have Unified Remote Server installed. Screenshot 1 | Screenshot 2 | Video
Interactive Drawing/Desktop Capture Tools
MimioTeach comes with a software package to capture pen entries, the others do not. Therefore, various free downloadable tools exist to enable teachers to annotate and draw on the desktop/screen of a Windows or Mac PC, as if they were using an interactive whiteboard. These include:


