Images © Microsoft
Microsoft Kinect is a motion sensor, a video and depth camera that detects body motion interactions. It can be used on Windows and Mac devices for motion capture programs and touch-less / non-contact interactions.
Hardware:
Microsoft have released four versions of the Kinect:
Hardware:
Microsoft have released four versions of the Kinect:

Kinect For Windows Kinect For X-Box One Kinect For X-Box 360 Kinect Diagram
- Kinect for X-Box 360 (discontinued)
- Kinect For Windows v1 (discontinued)
- Kinect For X-Box One (discontinued)
- Kinect For Windows v2 (discontinued)
No matter what version of Kinect you use, it can be connected to a Windows or Mac device (including via Bootcamp) using a dual AC and USB adaptor (360 or v1 | One or v2).
Drivers & Software
1. Users running Windows XP, 7, 8, 8.1 or 10 should install each of the following supporting or prerequisite programs in the following order:
- Microsoft DirectX® SDK - June 2010 or a later version
- DirectX 9.0c End-User Runtime
- DirectX End-User Runtime Web Installer - installs updates to 9.0c and previous versions of DirectX
- DirectX End-User Runtimes (June 2010)
- Microsoft Visual Studio 2010 Express, Microsoft Visual Studio 2010 SDK & Microsoft Visual Studio 2010 Service Pack 1 or Microsoft Visual Studio Express 2013 (When you run either Microsoft Visual Studio installation, you will be given a variety of options to install. Select 'Microsoft Visual Studio C++').
- Microsoft Visual C++ 2012 Redistributable
- Microsoft .NET Framework 4 and 4.5 installed. Windows 8 and 8.1 already have .NET 4.5 installed (which replaces .NET 4).
There are a variety of free and paid third-party software titles perfect for use in educational, home and business settings. These programs can be separated into two categories:
Programs that require Microsoft's Kinect for Windows Software Development Kit (SDK)
Dependant upon which version of the Kinect you have and the app that you use, you may need the following versions of the official Kinect installation packages installed (NOTE: Most programs will include these installation packages in their programs):
|
Kinect for Xbox 360 / Kinect v1
And also install: |
Kinect for Xbox One / Kinect v2
|
The following programs (most are free) work using the Microsoft Kinect SDK drivers:
- Ubi Interactive: Turns any surface into an interactive touch screen (paid)
- Touchless Touch: Turns any surface into an interactive touch screen (free and paid)
- Win&I: Control a Windows 7 PC using hand gestures
- 3D Human Motion Capture Software: Motion capture and animation software (free and paid)
- Kinect PowerPoint Control: Control PowerPoint presentations using hand gestures (free)
- Control:mapper: Assign human movements to key strokes, mouse commands or gamepad/joystick buttons (free and paid)
- Flexible Action and Articulated Skeleton Toolkit (FAAST): Allows users to assign full-body control for gaming and VR applications (free).
Ubi Interactive
Ubi provide a variety of paid software touch solutions (from 1 touch point to 20) designed to turn any surface into an interactive touch screen.
Ubi Interactive also comes with an optional pen to make writing, annotating and other content creation activities much more precise, ergonomic and responsive.
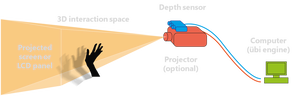
Hardware:
Kinect
Projector
Computer with Windows 8 (4GB RAM, Dual-core 2.66-GHz)
Software:
Download the free trial here, both of which will install version 1.8 of the Kinect SDK, Runtime and Developer Toolkit:
Kinect
Projector
Computer with Windows 8 (4GB RAM, Dual-core 2.66-GHz)
Software:
Download the free trial here, both of which will install version 1.8 of the Kinect SDK, Runtime and Developer Toolkit:
- Windows 7: Requires Kinect SDK v1.7
- Windows 8/10: Requires Kinect SDK v1.8
Touchless Touch
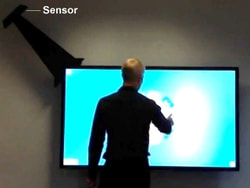
Touchless Touch turns any surface into a multi-touch screen, supporting 128 touch-points. Works with both Kinect and OpenNI sensors.
A free unlimited trial version is available but it can only be used for personal use and comes with a Touchless Touch logo watermark on the display. The paid versions costs $US60.
A free unlimited trial version is available but it can only be used for personal use and comes with a Touchless Touch logo watermark on the display. The paid versions costs $US60.
Hardware:
Software
- (i) Connect a project to a laptop/PC and turn on the projector OR (ii) Connect a laptop/PC to an interactive whiteboard and turn both on.
- Mount the Kinect sensor(s) flat against the touch surface in one of the corners, pointing diagonally across to the opposite corner, at least 60cm away from the touch area
- Connect the Kinect via USB to the laptop/PC
Software
- Download and install Touchless Touch Software + Manual
- Open Touchless Touch.
- Follow the Touchless Touch calibration instructions from here.
Motion Capture and 3D Avatar Animation
iPi Soft have created motion capture software (iPi Recorder and iPi MoCap Studio) for tracking, capturing and processing 3D human movements using any Kinect or OpenNI compliant 3D sensors, Sony PlayStation Eye cameras and DirectShow-compatible webcams (USB and FireWire).
Ipi Recorder captures video and skeletal data to be used for motion tracking and use in iPi Mocap Studio. Watch the video below to see the programs in action and then read below to learn about each program and how to easily install and use them.
Ipi Recorder captures video and skeletal data to be used for motion tracking and use in iPi Mocap Studio. Watch the video below to see the programs in action and then read below to learn about each program and how to easily install and use them.
iPi Recorder
iPi Recorder is a free software program for capturing, playing back and processing video from multiple cameras and depth sensors without the need for expensive backdrops, lighting, or sensor suits with reflective markers. It is so simple that even young primary school students can use it to capture their movements. Movement capture can also be enhanced using Nintendo Wiimotes or Playstation Move controllers too.
iPi Recorder is a free software program for capturing, playing back and processing video from multiple cameras and depth sensors without the need for expensive backdrops, lighting, or sensor suits with reflective markers. It is so simple that even young primary school students can use it to capture their movements. Movement capture can also be enhanced using Nintendo Wiimotes or Playstation Move controllers too.
Simply:
- If you are using an Kinect for X-Box on the PC do not plug in the Kinect to the computer's USB port.
- Download and install the KinectDeveloperToolkit-v1.8-Setup, KinectRuntime-v1.8-Setupand KinectSDK-v1.8-Setup.
- Restart the computer.
- Plug the Kinect into the USB port of the PC.
- Download iPi Recorder.
- Follow the installation guide to install iPi Recorder.
- Restart the computer.
- Plug in the Kinect for X-Box into the computer's USB port (USB 3.0 is preferred to USB 2.0).
- Watch the video below to learn how to use iPi Recorder (and should you require further information, read the following user guide).
3D Characters
In the video above it shows a pre-made 3D character (an .fbx file) being imported for animation mapping to the human motions captured using the Kinect. You can download 288 free pre-made .fbx (and other file extensions) 3D characters from here, another 96 free 3D models from here and a variety of other free 3D models and objects from here.
Should you wish to create your own 3D characters, Mixamo Fuse (paid) allows users to drag, drop and manipulate a variety of virtual body parts to create 3D characters in only a few minutes.
Ready-made Motion Captures
Instead of buying, installing and then having students wait to use motion capture hardware such as the Kinect, ready-made human motion captures can also be downloaded for free from:
For some of these ready-made human motion captures, should you require assistance in converting between the different file extensions (e.g. .mov to .fbx), click here.
In the video above it shows a pre-made 3D character (an .fbx file) being imported for animation mapping to the human motions captured using the Kinect. You can download 288 free pre-made .fbx (and other file extensions) 3D characters from here, another 96 free 3D models from here and a variety of other free 3D models and objects from here.
Should you wish to create your own 3D characters, Mixamo Fuse (paid) allows users to drag, drop and manipulate a variety of virtual body parts to create 3D characters in only a few minutes.
Ready-made Motion Captures
Instead of buying, installing and then having students wait to use motion capture hardware such as the Kinect, ready-made human motion captures can also be downloaded for free from:
- The Carnegie Mellon University Motion Capture Database - Contains interactions between humans, humans and their environment, locomotion, physical activities & sports, and situations & scenarios
- Mocapdata.com - Contains several hundred paid and free animations in various categories licenced under a CC Attribution licence
- Ohio State University - Contains motion captures such as swagger, break-dancing and martial arts.
For some of these ready-made human motion captures, should you require assistance in converting between the different file extensions (e.g. .mov to .fbx), click here.
iPi MoCap Studio
iPi MoCap Studio allows users to produce, edit and transfer 3D animations. Simply:
iPi MoCap Studio allows users to produce, edit and transfer 3D animations. Simply:
- Download the iPiMocap 30 day trial version. After the end of 30 days trial period, iPi Mocap Studio Trial Version will continue functioning but animation export will be disabled.
- Follow the installation guide.
- Read the user guide.
PowerPoint Control
Kinect PowerPoint Control allows users to control PowerPoint presentations use hand gestures
(e.g. extend hand to the right to go to the next slide).
Check out the video below to see Kinect PowerPoint Control in action:
(e.g. extend hand to the right to go to the next slide).
Check out the video below to see Kinect PowerPoint Control in action:
Installation Instructions
- Do not plug in the Kinect to the computer's USB port.
- Download and install KinectDeveloperToolkit-v1.7-Setup, KinectRuntime-v1.7-Setup and KinectSDK-v1.7-Setup or KinectDeveloperToolkit-v1.8-Setup, KinectRuntime-v1.8-Setup and KinectSDK-v1.8-Setup.
- Restart the computer.
- Plug the Kinect into the USB port of the PC.
- Download the compiled version of Kinect PowerPoint Controller from here.
- Unzip KinectPowerPointControl.zip
- Run KinectPowerPointControl.exe
- Minimise Kinect PowerPoint Control.
- Open a PowerPoint presentation.
- Go to Slideshow view.
- Extend your hand right to go to the next slide/transition, extend left to go back a slide/transition.
Control:mapper
Control:mapper allows users to assign speech and full body skeletal movements to control a mouse cursor and keyboard keys. It can be used for virtually anything and is brilliant in replacing gaming controllers.
Watch the video below to see Control:mapper in action:
Mouse Mode:
Watch the video below to see Control:mapper in action:
Mouse Mode:
Game Controller Mode:
Installation Instructions
- If you are using an Kinect for X-Box on the PC do not plug in the Kinect to the computer's USB port.
- Download and install the latest Kinect for Windows SDK (v1.6-v1.8 works).
- Restart the computer.
- Download Microsoft Speech SDK 11 here.
- Restart the computer.
- Plug the Kinect into the USB port of the PC.
- Download control:mapper from here.
- Run the control:mapper installation file.
- Open control:mapper.
- Watch the control:mapper video tutorials here.
Flexible Action and Articulated Skeleton Toolkit (FAAST)
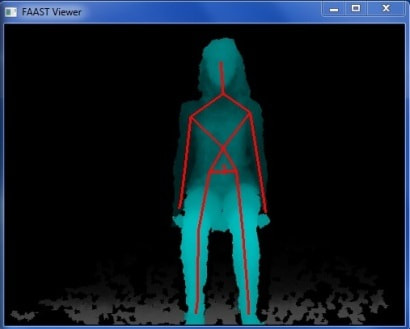
FAAST is a skeleton tracking software that allows users to create their own full-body controls to integrate with any software program.
FAAST emulates keyboard and mouse inputs triggered by body posture and specific gestures. This allows any users, including teachers and students to create custom body-based controls to control any program using their body movements (e.g. control a flash game or Microsoft Office program with a using body movements or gestures).
FAAST emulates keyboard and mouse inputs triggered by body posture and specific gestures. This allows any users, including teachers and students to create custom body-based controls to control any program using their body movements (e.g. control a flash game or Microsoft Office program with a using body movements or gestures).
Using FAAST to emulate mouse & keyboard controls to play video games.
|
Activating and testing skeletal tracking in FAAST
|
Using FAAST to emulate a mouse.
|
FAAST is free to use and distribute for both commercial and non-commercial purposes.
Installation Instructions
Installation Instructions
- If you are using an Kinect for X-Box on the PC do not plug in the Kinect to the computer's USB port.
- Download and install the latest Kinect for Windows SDK.
- Restart the computer.
- Install the Microsoft Visual C++ 2012 Redistributable.
- Restart the computer.
- Plug the Kinect into the USB port of the PC.
- Download FAAST from here.
- Run FAAST.
- If prompted by Windows Firewall, click “Allow access”
|
s11. Check the Viewer window (pictured right) to make sure that the you / the user is seen by the Kinect sensor and a red stick figure skeleton is drawn over the user.
If this does not occur, cover and uncover the camera on the Kinect sensor to reset the field of vision. Also, have the user wave his or her arms so that FAAST can recognize the user. 12. Read the FAAST user guide from here or watch the video tutorials below. |
|
Programs that require OpenNI, NITE and PrimeSense
OpenNI (owned by PrimeSense) was a non-profit organisation focused on providing open access to natural user interfaces. OpenNI (software), NITE (middleware) and PrimeSense (hardware) drivers are an alternative to the Microsoft Kinect SDK drivers. The following programs work only using the free OpenNI, NITE and PrimeSense drivers.
The following programs work using the OpenNI, NITE and PrimeSense drivers:
Note:
The following programs work using the OpenNI, NITE and PrimeSense drivers:
- ViiHaptic: Turns any display or surface of any size into a multi-touch screen! - OpenNI 1.5.4.0
- Kinoogle: Control Google Earth virtually using hand gestures (e.g. grab with two hands and expand to zoom in and contract to zoom out) or body motions (e.g. walking when using Street View) - Open NI 1.0.0.0
- Winect: Control Windows using hand gestures.
- Kinect Juggle: An augmented reality app to practise your juggling skills!
- TipTep Mouse: Control Windows using your index finger.
Note:
- If you are attempting to install any of the following Kinect programs on a Windows 8 or 8.1 PC, you must enable notification for driver signature verification by following the steps from here: Windows 8 / Windows 8.1
- Every time you restart your computer, Windows 8 or 8.1 disables the notification for driver signature verification! So if you install an OpenNI/PrimeSense Kinect program and then restart/turn off your computer, you will have to re-enable notification for driver signature verification before attempting to install any OpenNI/PrimeSense Kinect programs by following the steps from here: Windows 8 / Windows 8.1.
- The OpenNI website was shut down on April 23, 2014, after Apple acquired PrimeSense. Some of the following programs that require OpenNI, NITE and PrimeSense drivers already contain the required files within each program's installation file(s). For those programs that require users to separately download and install OpenNI, NITE and PrimeSense drivers, working links to these files have been provided and hosted by Effective Curriculum Ideas.
ViiHaptic
Image © Covii
ViiHaptic when combined with a sensor such as a Microsoft Kinect amazingly turns any display or surface of any size into a multi-point touch screen!
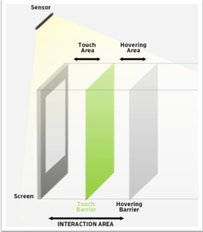
ViiHaptic can also use the depth sensors contained within a Kinect to determine the difference between a touch and a hover (near touch), allowing users to potentially not just touch but also "handle" contents at a distance (pictured left).
Watch the video below to see ViiHaptic in action:
ViiHaptic can also use the depth sensors contained within a Kinect to determine the difference between a touch and a hover (near touch), allowing users to potentially not just touch but also "handle" contents at a distance (pictured left).
Watch the video below to see ViiHaptic in action:
Installation Instructions:
- Download ViiHaptic.
- If you are attempting to install ViiHaptic on a Windows 8 or 8.1 PC, you must enable notification for driver signature verification by following the steps from here: Windows 8 / Windows 8.1.
- Run the installation file.
- OpenNI 1.5.4.0 will install.
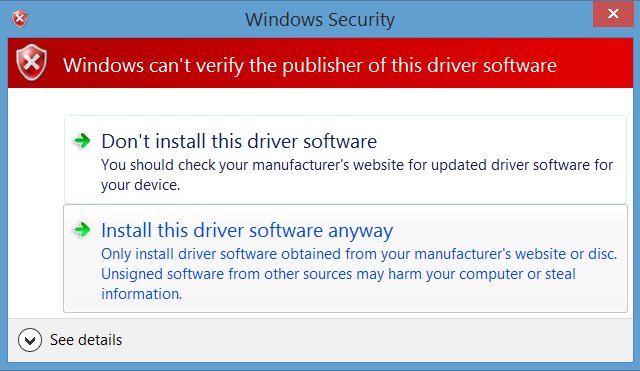
- PrimeSense 5.1.2.1 will install and you should be prompted with the following warning:

Click on 'Install this driver software anyway. Note: If the above warning message does not appear then you must enable notification for driver signature verification by following the steps from here: Windows 8 / Windows 8.1.
6. PrimeSense Sensor 5.1.2.1 with Kinect Mod will install.
7. Restart the PC.
8. Connect the Kinect via the PC's USB port.
9. Place the Kinect as depicted in the image and discussed in the dot points below:
6. PrimeSense Sensor 5.1.2.1 with Kinect Mod will install.
7. Restart the PC.
8. Connect the Kinect via the PC's USB port.
9. Place the Kinect as depicted in the image and discussed in the dot points below:
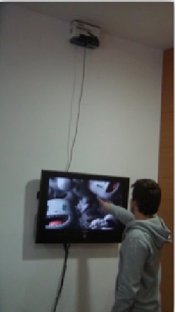
Image © Covii
- The Kinect sensor should be placed more or less perpendicular to the screen or surface one wants to turn interactive
- The distance between the Kinect sensor and the surface should be sufficient so that the sensor can “see” all the area you want to interact with, and that depends on the sensor (and lenses) used
- The Kinect sensor should be place at a distance greater than 500mm because this is the smaller distance one can obtain a depth image.
- The horizontal field-of-view for this type of sensor is bigger than 45 degrees, which means that you can fit in the image an object slightly bigger than the distance you are from it (e.g. If you have a screen that is 800mm wide and want to interact with all of the screen’s area, you can place the sensor at a distance of 800mm).
11. Configure the Kinect and ViiHaptic following Section 5 of the ViiHaptic documentation.
Kinoogle

Images © Bryan Blanchard, Benton Minges, Julio Montero & Cory Walker:
Department of Computer Science and Engineering Texas A&M University, 2011
Department of Computer Science and Engineering Texas A&M University, 2011
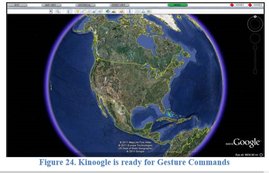
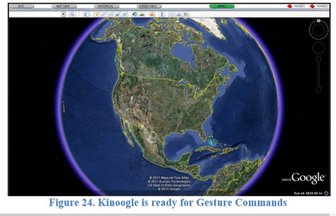
Kinoogle is a gesture and body movement interface for Google Earth, designed in 2011 by four university students: Bryan Blanchard, Benton Minges, Julio Montero & Cory Walker from the Department of Computer Science and Engineering at Texas A&M.
Once installed, Kinoogle creates a small GUI window which rests on top of the Google Earth desktop application (pictured left).
Watch the video below to see Kinoogle in action.
Once installed, Kinoogle creates a small GUI window which rests on top of the Google Earth desktop application (pictured left).
Watch the video below to see Kinoogle in action.
Video © Bryan Blanchard, Benton Minges, Julio Montero & Cory Walker: Department of Computer Science and Engineering Texas A&M University, 2011
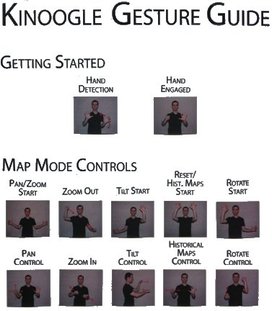
As demonstrated in the video above, Kinoogle allows users to use gestures to interact and manipulate the map image on the screen:
View the hand gestures (pictured left) to see how users can easily interact with Google Earth.
- The system allows a user to move the view of the earth around. They can pan, zoom, tilt, and rotate the view. The system detects whether the user's hands are open or closed, so users are literally “grabbing” the Earth.
- Users can also enter Street View, and “walk” around on the street.
View the hand gestures (pictured left) to see how users can easily interact with Google Earth.
Image and information from Kinect Google Final Report and Presentation © Bryan Blanchard, Benton Minges, Julio Montero & Cory Walker: Department of Computer Science and Engineering Texas A&M University, 2011
Installation Files & Instructions
Pre-installation
Google Earth Installation
Kinoogle GUI Installation
- Uninstall any Microsoft Kinect programs (via Control Panel) and drivers (Computer--> Manage --> Device Manager).
- Uninstall any OpenNI, NITE, Prime Sense and Prime Sense Kinect Mod programs (via Control Panel) and drivers (Computer--> Manage --> Device Manager). Kinoogle requires OpenNi 1.0 and will not work if any other version of OpenNI is installed.
- Restart the computer.
- If you are using Windows 8 or 8.1, you must enable notification for driver signature verification by following the steps from here: Windows 8 / Windows 8.1 (Note: Every time you restart your computer, Windows 8 or 8.1 disables the notification for driver signature diversification! So every time you attempt to install any OpenNI or PrimeSense drivers, you will have to enable notification for driver signature verification by following the steps from here: Windows 8 / Windows 8.1.).
Google Earth Installation
- Download and install Google Earth.
- Close Google Earth.
Kinoogle GUI Installation
- Download the three-part installation package for Kinoogle (Part 1, Part 2 & Part 3).
- Unzip the contents of Parts 1 (1476-072X-10-45-S1.ZIP), 2 (1476-072X-10-45-S2.ZIP) and 3 (1476-072X-10-45-S3.ZIP) to the same hard drive location.
- Run (double-click) 'Additional_file.part1.exe' from that location and choose the desired installation directory for the Kinoogle installation files.
- Navigate to the Kinoogle installation directory.
- Open the KinoogleInstallerFull folder.
- (i) Read the warnings/recommendations below, (ii) then open the Kinect Installer Walkthrough.pdf and follow the steps in the guide.
- For Windows 8 or 8.1: During the installation you must see the following message (see image below). If you do not see this message then you have not enabled notifications for driver signature verification. If you did not see the message during the Kinoogle installation process then you must (i) disconnect the Kinect from the computer's USB port, (ii) uninstall all OpenNI and PrimeSense drivers, (iii) restart the computer, (iv) enable notifications for driver signature verification by following the steps from here: Windows 8 / Windows 8.1
- Inside the Kinect Installer Walkthrough PDF it states in step 2 to navigate to the newly-installed Kinoogle folder (C:\Program Files\Kinoogle) , run UpdateNITE.exe. - Do not forget to do this step
- Once all steps of the installation procedure have been followed then restart the PC/Mac before attempting to run NiViewer.exe or it will not work
- If when you run NiViewer.exe and the dialogue box states, 'Unknown USB device speed', then plug the Kinect into a USB 3.0 port (if the machine has one).
Google Earth Operation
There are several steps to take to make Google Earth work smoother with Kinoogle:
- Turn off the sidebar and toolbar: This can be done by selecting View and unchecking Toolbar and Sidebar.
- Turn off historical maps: Historical Maps is located under View, and make sure it is unchecked as well. This will allow Kinoogle to turn historical maps on when it is necessary.
- Put Google Earth into full screen mode. This can be done by selecting View and then Full Screen or by using the shortcut key F11.
Image © Bryan Blanchard, Benton Minges, Julio Montero & Cory Walker: Department of Computer Science and Engineering Texas A&M University, 2011
Kinoogle Operation
Once you have opened Google Earth and Kinoogle you should see the Kinoogle toolbar on top of the Google Earth window (pictured right).
There are five buttons (Exit, Map View, Historical, Street View and Menu) and two diamonds (Hand 1 and Hand 2: coloured red or yellow).
You must then follow the calibration steps from the Kinoogle Final Report by downloading the Kinoogle calibration and operation instructions here.
Kinoogle Further Reading
Whilst the file links and information contained above are exactly what you need to get Kinoogle up and running, the following links have been made available should you wish to peruse the original project documents:
- Project Files @ Google Sites
- Final Report
- Final Presentation
- Critical Design Review
- Journal Article 'Web GIS in practice X: a Microsoft Kinect natural user interface for Google Earth navigation' published in the National Institutes of Health Int J Health Geogr. 2011; 10: 45. Published online Jul 26, 2011. doi: 10.1186/1476-072X-10-45
Winect
Winect is a free program that allows users to control Windows using hand gestures.
Hardware:
Software
Download and install in this order:
- Connect a PC to a projector.
- Turn on the projector.
- Place the Kinect sensor on the ledge of the classroom whiteboard/wall where the projector is projecting or on top of the monitor (as pictured above) but do not connect the Kinect sensor to USB port on the PC.
Software
Download and install in this order:
- Uninstall any Microsoft Kinect programs (via Control Panel) and drivers (Computer--> Manage --> Device Manager).
- Uninstall any OpenNI, NITE, Prime Sense and Prime Sense Kinect Mod programs (via Control Panel) and drivers (Computer--> Manage --> Device Manager).
- Restart the computer.
- If you are using Windows 8 or 8.1, you must enable notification for driver signature verification by following the steps from here: Windows 8 / Windows 8.1.
- Install Microsoft .Net 3.5 Client Profile.
- Install OpenNI 1.5.x.x Development Version (64-Bit: 1.5.7.10, 32-Bit: 1.5.7.10).
- Install OpenNI NITE Development Version (64 Bit: 1.5.2.3 32 Bit: 1.5.2.1).
- Install Avin2's Primesense Sensor Kinect Mod 093-Bin - v5.0.3.40 x86.
- Restart the computer.
- Download and install Winect.
- Plug in the Kinect external power supply and connect to the computer USB port. The new hardware should then be detected and drivers installed. If successful these will show up in Device Manager as items Kinect Audio, Kinect Camera and Kinect Motor under Prime Sense (In order to check whether the driver is successfully connected to your PC navigate to Device Manager (Control Panel--Printers and Other Hardware--System--Hardware--Device Manager or go to My Computer--Right Click--Properties--Hardware--Device Manager).
Kinect Juggle
Kinect Juggle is a great app to demonstrate to students that the Kinect can:
- Track multiple hands.
- Track multiple users.
- Use the camera as an augmented reality device.
- Software
- Uninstall any Microsoft Kinect programs (via Control Panel) and drivers (Computer--> Manage --> Device Manager).
- Uninstall any OpenNI, NITE, Prime Sense and Prime Sense Kinect Mod programs (via Control Panel) and drivers (Computer--> Manage --> Device Manager).
- Restart the computer.
- If you are using Windows 8 or 8.1, you must enable notification for driver signature verification by following the steps from here: Windows 8 / Windows 8.1.
- Install Microsoft .Net 3.5 Client Profile.
- Install OpenNI 1.5.x.x Development Version (64-Bit: 1.5.7.10, 32-Bit: 1.5.7.10).
- Install OpenNI NITE Development Version (64 Bit: 1.5.2.3 32 Bit: 1.5.2.1).
- Install Avin2's Primesense Sensor Kinect Mod 093-Bin - v5.0.3.40 x86.
- Restart the computer.
- Download and unzip Kinect Juggle v0.1.
Hardware:
- Plug in the Kinect external power supply and connect to the computer USB port. The new hardware should then be detected and drivers installed.
Software:
- Run kinect-juggle-v0.1.exe
- As displayed in the image below, two windows will open a) Camera b) Instructions.
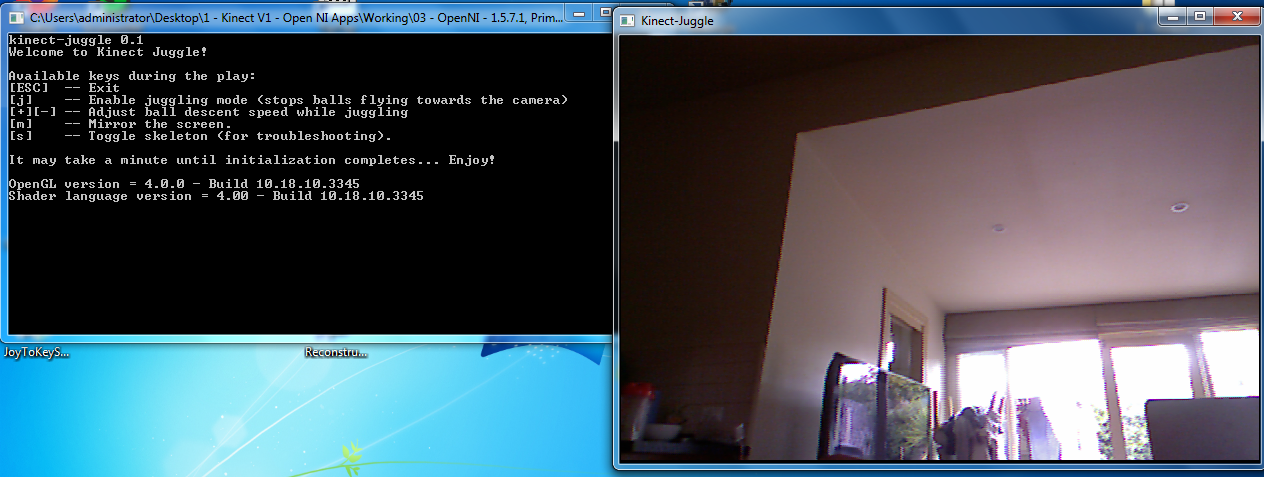
- Enable juggling by pressing the J key (pressing it again will disable juggling).
- The speed of the ball can be controlled using the + and _ keys.
TipTep Mouse
TipTep is a great app to control a Windows device using your finger as a mouse. It can be used to demonstrate to students that the Kinect can:
- Track multiple hands.
- Track multiple fingers.
- Assign actions to each finger (in this case, the index finger).
- Software
- Uninstall any Microsoft Kinect programs (via Control Panel) and drivers (Computer--> Manage --> Device Manager).
- Uninstall any OpenNI, NITE, Prime Sense and Prime Sense Kinect Mod programs (via Control Panel) and drivers (Computer--> Manage --> Device Manager).
- Restart the computer.
- If you are using Windows 8 or 8.1, you must enable notification for driver signature verification by following the steps from here: Windows 8 / Windows 8.1.
- Install Microsoft .Net 3.5 Client Profile.
- Install OpenNI 1.5.7.10 Redistributable Version (64-Bit: 1.5.7.10, 32-Bit: 1.5.7.10).
- Install OpenNI NITE Development Version (64 Bit: 1.5.2.21 32 Bit: 1.5.2.21).
- Install Avin2's Primesense Sensor Kinect Mod 091-Bin - v5.1.0.25 (64-Bit | 32-Bit).
- Restart the computer.
Hardware:
- Plug in the Kinect external power supply and connect to the computer USB port. The new hardware should then be detected and drivers installed.
Software:


